Motion Detectors
Motion detectors, as their name suggests, are sensors that are used to sense movement. They are commonly seen in security alarms and motion triggered lighting systems but can be used in conjunction with linear actuators for a wide range of cool applications. One common application of linear actuators and motion detectors being used together is within haunted houses for jump scares. But together linear actuators and motion detectors can also be used for a wide range of home automation projects.

When you think of motion detectors, you generally think about 2 types:
- Passive Infrared – Which measures changes in body heat (infrared energy) to detect movement
- Microwave – Which measures reflections off objects using microwaves to detect movement
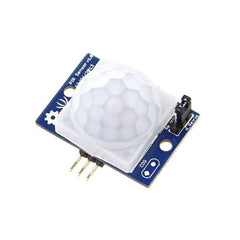
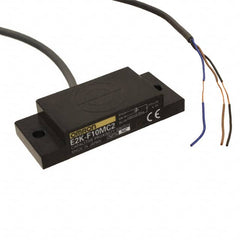
These two types of motion detectors are the most common as they are often used in applications like security systems. Although, there are many other types of motion detectors available including area reflective sensors, which uses inferred light, vibration sensors, and ultrasonic sensors [1]. For use with hobbyists and DIY projects, the most commonly available and used type of motion detector is the Passive Infrared (PIR) motion sensor. Because of this, the rest of this blog will focus on how to use a PIR motion detector with your linear actuator. While each type of sensor will have different implementations, much of what is described below about how to control a linear actuator with a motion detector will be similar for all types of motion detectors.
What about Proximity Sensors?
Proximity sensors are not motion detectors as they detect the proximity of an object rather than motion. Functionally, a proximity sensor can tell you how close an object is to the sensor whether the object is moving or not. While motion detectors, will only trigger when there is movement regardless of how close an object is. You can utilize proximity sensors as motion detectors as the output of the proximity sensors will change when an object or person moves in front of the sensor. Although, proximity sensors only detect how close the closest object is to the sensor, so if something was to move behind the closest object, the proximity sensor would not detect this movement. While using a proximity sensor as a motion detector is possible, it may not be the best solution for your design.

Setting Up Your PIR Motion Detector
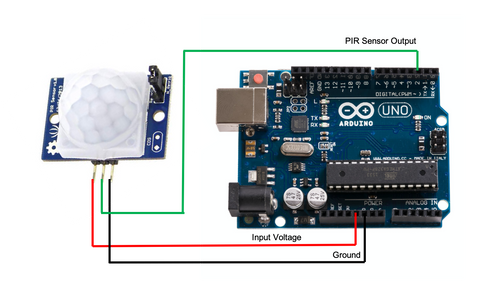
If you are looking to design your own jump scare robot for Halloween or have another motion sensitive project in mind, you’re going to want to utilize your PIR motion detector as an input switch to determine when your linear actuator should move. To do this, you are going to want to make use of a microcontroller, like an Arduino, to read the output of your PIR motion detector and to drive your linear actuator. The output of the PIR motion detector is similar to a simple push button, when there is motion the sensor will send a high signal or voltage to the microcontroller and when there is no motion it will send a low signal or voltage. You may also want to test you PIR sensor before installing it into your design as some PIR sensors allow you to adjust the sensitivity of the sensor for better performance.

As you won’t know when someone will walk pass your motion detector, you will need to either be constantly reading the output of the PIR sensor in the main loop of your code or you can make use of external interrupts. External interrupts are pins of the Arduino that detect a change in voltage and in our case can be used to alert the Arduino that our PIR sensor has detected movement. Depending on your application, either method of reading the output of the PIR sensor is feasible, although the latter is considered best practice as it ensures your code won’t miss any movement detected by the PIR sensor. If you plan to use an external interrupt to detect a change from your motion detector, you will need to consult your Arduino’s datasheet to ensure what pins of your microcontroller can be used as interrupt pins. If not, you can simply connect the output of the PIR sensor to any of the digital input pins of the Arduino. The PIR sensor will also need to be connected to an appropriate power source and to a common ground.
Motion Controlled Linear Actuator
In both of the examples below, the Arduino controls the linear actuator using a motor driver. To learn how to drive a linear actuator with a motor driver or other intermediate components, like relays, you can check out our post on How to Control a Linear Actuator with an Arduino. Also, neither example below utilizes a feedback linear actuator or external limit switches in their design, which would give you more control over your actuator than without. If you are interested on how and what feedback options are available, you can check out our post on the topic here.
| bool motionDetected = LOW; // Motion Detection Flag | |
| void setup() { | |
| /*Setting Up Interrupt*/ | |
| pinMode(2, INPUT); | |
| attachInterrupt(digitalPinToInterrupt(2), motionDetector, RISING); | |
| } | |
| void loop() { | |
| } | |
| /*Interrupt Service Routine*/ | |
| void motionDetector(void){ | |
| motionDetected = HIGH; | |
| } |
The code example above shows how to setup an interrupt in the Arduino IDE where the interrupt will be triggered on the rising edge of the voltage pulse. You can set up your interrupt to be triggered at different points in a voltage change and should consult your microcontroller’s datasheet to determine the available options. Once you have identified and selected an appropriate interrupt pin, the last aspect you need to do to set up your interrupt is to write your interrupt service routine. The interrupt service routine is a simple function that the code will run every time the interrupt is triggered. In our case, our interrupt service routine motionDetector simply sets the flag motionDetected to high when the interrupt is triggered.
| bool motionDetected = LOW; // Motion Detection Flag | |
| long timeStamp = 0; // Time when Actuator Starts Extending | |
| static long delayTime = 10000; // Delay after Motion Detector is Triggered in ms | |
| void setup() { | |
| pinMode(10, OUTPUT); // Configure pin 10 as an Output | |
| pinMode(11, OUTPUT); // Configure pin 11 as an Output | |
| /*Setting Up Interrupt*/ | |
| pinMode(2, INPUT); | |
| attachInterrupt(digitalPinToInterrupt(2), motionDetector, RISING); | |
| } | |
| void loop() { | |
| if(motionDetected == HIGH){ | |
| /*Extend Linear Actuator*/ | |
| analogWrite(10, 255); | |
| analogWrite(11, 0); | |
| if(millis() - timeStamp > delayTime){ | |
| motionDetected = LOW; | |
| } | |
| } else{ | |
| /*Retract Linear Actuator*/ | |
| analogWrite(10, 0); | |
| analogWrite(11, 255); | |
| timeStamp = millis(); | |
| } | |
| } |
Once your Arduino has read the output of your PIR sensor, either by using an external interrupt or by simply reading the output, how you utilize this feedback to control your linear actuator will depend on your design and your application. As the PIR sensor only provides a binary feedback, like a push button, the level of control over the linear actuator will be limited. One way to control the linear actuator with this feedback is to tell the actuator to move whenever motion is detected, which could be useful in applications like robotic jump scares in a haunted house. The above code shows how you could implement this design. Once the motionDetected flag is set to high, we extend the linear actuator forward and after 10 seconds, the flag is reset to low and the actuator retracts for the next jump scare. As we only use the motion detector to tell the Arduino that someone is there, we make use of a timer to reset the flag and wait for the next person to walk by.
| bool motionDetected = LOW; // Motion Detection Flag | |
| long timeStamp = 0; // Time when Actuator Starts Extending | |
| static long delayTime = 60000; // Delay after Motion Detector is Triggered in ms | |
| bool timerFlag = LOW; // Flag for Time Delay | |
| void setup() { | |
| pinMode(10, OUTPUT); // Configure pin 10 as an Output | |
| pinMode(11, OUTPUT); // Configure pin 11 as an Output | |
| /*Setting Up Interrupt*/ | |
| pinMode(2, INPUT); | |
| attachInterrupt(digitalPinToInterrupt(2), motionDetector, RISING); | |
| } | |
| void loop() { | |
| if(timerFlag == HIGH) { | |
| if(motionDetected == HIGH){ | |
| /*Extend Linear Actuator*/ | |
| analogWrite(10, 255); | |
| analogWrite(11, 0); | |
| } else if(motionDetected == LOW) { | |
| /*Retract Linear Actuator*/ | |
| analogWrite(10, 0); | |
| analogWrite(11, 255); | |
| timeStamp = millis(); | |
| } | |
| if(millis() - timeStamp > delayTime){ | |
| timerFlag = LOW; | |
| } | |
| }else{ | |
| timeStamp = millis(); | |
| } | |
| } | |
| void motionDetector(void){ | |
| if(timerFlag == LOW){ | |
| motionDetected = !motionDetected; | |
| timerFlag = HIGH; | |
| } | |
| } |
Another method is to toggle between extended and retracted positions of the linear actuator every time motion is detected, which may be useful in home automation applications. The implementation of this approach is shown above. In the interrupt service routine, the flag motionDetected is toggled every time the PIR sensor detects movement. When the flag is set to high, the linear actuator is extended and when the flag is set to low, the actuator is retracted. We also have added another flag timerFlag which is used add time delay after the PIR motion detector is triggered. This flag is set HIGH when the interrupt is first triggered and is only sent low after the designed time delay, which is one minute in this example. It is also used to ensure the value of the flag motionDetected is not toggle until after this time delay.
Reference:
- Tross, K. (2019, October). The Beginner’s Guide to Motion Sensors. Retrieved From: https://www.safewise.com/resources/motion-sensor-guide/