In this example we’ll control the speed a linear actuator with an Arduino and motor driver.
Note: This tutorial assumes prior knowledge with basic electronic principles, Arduino hardware and software. If this is your first time using Arduino we suggest learning the basics from one of the many great beginner tutorials available through Google and YouTube searches. Please be aware that we do not have the resources to provide technical support for custom applications and will not debug, edit, provide code or wiring diagrams outside these publicly available tutorials.
Components
- 12V Linear Actuator
- 12V power supply
- Arduino
- Motor Driver
- Potentiometer (optional)
- Electrical wires for making connections and crimping tool or soldering iron
Wiring
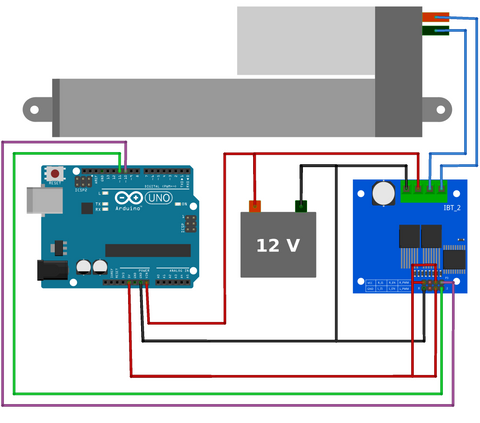
Hardware and software overview
The DC motors in linear actuators require a high current (up to 5A), if we were to connect the linear actuator directly to the Arduino this high current draw would destroy the Arduino digital pins as they are only rated for 40mA each. Therefore we use a motor driver that can take a low current PWM (pulse width modulation) signal from the Arduino board and output a high current PWM signal to the linear actuator.
The motor driver is connected to two PWM digital pins (pins 10 and 11 on the Arduino Uno). By setting one of these pins LOW and the other HIGH (see line 18 and 19 in code below) we can extend the actuator at maximum speed. To stop the actuator we set both pins to LOW (see line 21 and 22 in code below)and to reverse the direction of motion we can reverse the order of the HIGH and LOW pins (see line 24 and 25 in code below). We can also adjust the speed by changing the variable “Speed” to any value in the range [0, 255]; see line 17 in code below.
Code
https://gist.github.com/Will-Firgelli/c0ef0871dc1946d75257e0c29dccae2a
/* Firgelli Automations
 * Limited or no support: we do not have the resources for Arduino code support
 *
 * Program demos how a motor driver controls direction & speed of a linear actuator
 */

int RPWM = 10;  //connect Arduino pin 10 to IBT-2 pin RPWM
int LPWM = 11;  //connect Arduino pin 11 to IBT-2 pin LPWM
int Speed;

void setup() {
  pinMode(RPWM, OUTPUT);
  pinMode(LPWM, OUTPUT);
}

void loop() {
  Speed = 255;                    //choose any speed in the range [0,255]
  analogWrite(RPWM, 0);
  analogWrite(LPWM, Speed);
  delay(1000);                    //extend at given speed for one second
  analogWrite(RPWM, 0);
  analogWrite(LPWM, 0);
  delay(500);                     //stop for half a second
  analogWrite(RPWM, Speed);
  analogWrite(LPWM, 0);
  delay(1000);                    //retract at maximum speed for one second
}
Varied speed control with a potentiometer
In the above example we manually set the speed in line 17 of the code. However situations may arise where we want to vary the speed of the actuator in time. The easiest method to achieve this is by using a potentiometer. A potentiometer is a three terminal variable resistor that can act as a voltage divider. By rotating the knob of the potentiometer the output voltage will vary and we can connect this to the analog pin on an Arduino to set a variable speed.
Wiring
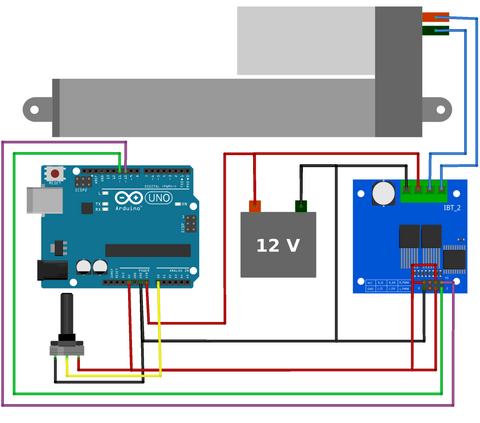
Hardware and software overview
As mentioned above, a potentiometer is a rotary device that changes resistance when the knob is rotated. By connecting the two outer pins of the potentiometer to 5V and GND, and the middle pin to the Arduino analog pin, A0, a voltage divider is created. As the knob is rotated the Arduino will read analog readings ranging from [0, 1023].
For values in the range [512, 1023] we want the actuator to extend and for values [0, 511] we want the actuator to retract, this can be achieved with a simple if()/else statement in lines 22 and 28 in the code below. Then using the map() function (line 23 and 29 in code below) we can convert this into a PWM signal that will control both the speed and direction of the actuator.
Code
https://gist.github.com/Will-Firgelli/d2cdf69edc829974885984b3fb8e4856
/* Firgelli Automations
 * Limited or no support: we do not have the resources for Arduino code support
 *
 * This progam controls the speed of a linear actuator via a potentiometer input
 */

int RPWM = 10;    //connect Arduino pin 10 to IBT-2 pin RPWM
int LPWM = 11;    //connect Arduino pin 11 to IBT-2 pin LPWM
int potPin = A0;  //analog pin that connects to centre potentiometer pin

int Speed, sensorVal;

void setup() {
  pinMode(RPWM, OUTPUT);
  pinMode(LPWM, OUTPUT);
  pinMode(potPin, INPUT);
}

void loop() {
  sensorVal = analogRead(potPin);       //read user input from the potentiometer

  if(sensorVal >= 512){                 //extension
    Speed = map(sensorVal, 512, 1023, 0, 255);
    analogWrite(RPWM, 0);
    analogWrite(LPWM, Speed);
  }

  else{                                 //retraction
    Speed = map(sensorVal, 0, 511, 255, 0);
    analogWrite(RPWM, Speed);
    analogWrite(LPWM, 0);
  }
} 


