One of the most common uses of linear actuators is to automate the opening or closing of a hatch or lid. These situations could include applications like raising a tonneau cover on a pickup truck or opening a trapdoor to a wine cellar. As discussed in our blog on How to Size a Linear Actuator, determining the stroke length and dynamic force requirements for these situations can be challenging due to the physical geometry of the application. To determine these requirements, you’ll need to utilize trigonometry and summation of torques. If you cannot find a linear actuator that suits these requirements, you may need to change your design, which means doing the calculations all over again. Luckily, the Linear Actuator Calculator is here to do the work for you and this blog will guide you on how to use it.
What does the Linear Actuator Calculator Allow Me to Do?
The linear actuator calculator allows you to describe your specific application and then select different actuators to determine if they will work within your design. The calculator will tell you the specific mounting positions and the exact force required for your application. This tool makes it easy to try out different linear actuators to find the one that will work best in your application.
The linear actuator calculator can be used for more than just applications where you are opening or closing a hatch. Any application that requires your linear actuator to cause rotational motion about a hinge or point of rotation is suitable to make use of this calculator. But if your application doesn’t fit that description, you can learn how to determine the force requirement here.
Dimensions
The dimensions, shown on the left-hand side of the calculator, are the input you feed into the calculator and describe your specific application. You can adjust these values to determine a suitable linear actuator with appropriate mounting positions.

Box Width – Box width is how wide the space underneath your hatch is, in inches. This value will potentially limit the physical size of a suitable linear actuator depending on the mounting positions. Typically, this is also the width of the lid itself, but in some applications, you may have more space underneath the lid than its width.
Box Height – Box height is how deep the space underneath your hatch is, in inches. This value is particularly important when you have limited space beneath the hatch, like with tonneau cover on a pickup truck, as it will limit the physical size of a suitable linear actuator. In situations where there is lots of space underneath the lid, like with a trapdoor to a cellar, the box height is less important.
Lid Weight – Lid weight is the weight of the lid you are opening or the size of the load you are rotating, in pounds. Obviously, this value will have a significant impact on the suitable linear actuator for your application.
Max Angle – The max angle is the maximum angle at which your lid will be open to and it ranges from 0 degrees (closed) to 90 degrees. Again, this value will have a significant impact on the suitable linear actuators available for your application.
Lid Mount Position – Lid mount position is the position where your linear actuator will be attached to the lid and is given in terms of inches away from the hinge. This value will range from 0” to the box width or the end of the hatch. If you are flexible in where the linear actuator is mounted to the lid, you can play around with this value to find results that best suit your application. Although in some applications, the location where you can mount the linear actuator to the lid will be limited.
Actuator Type – Actuator type is the type of actuator that you plan to use. Your actuator type of choice may depend on your application or desired features, like feedback options. You can check the different types of linear actuators available in our store to determine which one is best for you. If you’re not picky, you can try out different actuator types in the calculator to determine which one will best suit your needs.
Choose Actuator – Once you select a type of linear actuator, you will then select an actuator of that type with a specific stroke length. As you may not be sure what stroke length you require, you can easily try out different lengths to see if that particular actuator will fit your needs.
Number of Actuators – The number of actuators is the number of actuators involved in your application. While you can select either 1 or 2, the calculator will default to recommending using 2 actuators (one mounted on either side of the hatch) as it will have greater stability. You should never push a hatch open from just one side. We do have the option to change to 1, but only do this if you are mounting the actuator in the center of the hatch.
Diagram

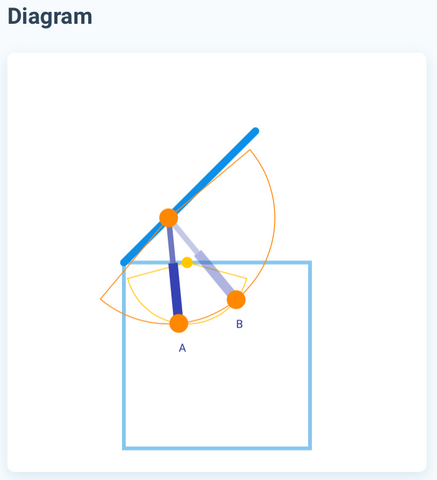
Once you have inputted your applications specifications and selected an actuator to test in the calculator, you can check out the diagram, on the center left-hand side of the calculator, for a visual representation of your inputs and your results. The diagram will always display a box, which is scaled based on your dimensions, with a lid, also scaled based on your dimensions, that is opened to the specified max angle, as shown in the image above. You will also always see an orange dot, located along the lid, and a yellow dot, located along the top of the box. These dots represent the actuator’s mounting position on the lid when fully opened, orange dot, and closed, yellow dot. The arcs that extend around the dots represent the total length of the actuator when extended and when closed, respectively. If the two arcs do not intersect, there is no feasible mounting position for that particular actuator to work in your design. If they do intersect, a linear actuator will appear on the diagram, as seen in the image above, and will display the feasible mounting position that works within your design. If there are multiple feasible mounting options, you can display all of them by selecting “yes” below the “Show Alternate Mounting Positions” on the bottom left-hand side of the calculator.
Results

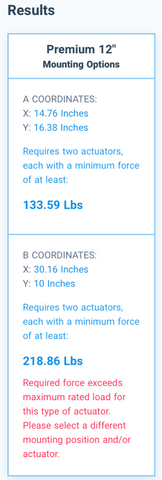
Once you have found an actuator that will fit within your design, the results will be shown on the center right-hand side of the calculator. The results will show the mounting coordinates and minimum force required for all feasible mounting positions, as shown in the image next to this paragraph. The mounting coordinates will be given in inches and as an XY coordinate. The X coordinate is the horizontal distance from the hinge, the Y coordinate is the vertical distance from the hinge. Displayed below the XY coordinate is the minimum force required from each actuator to allow for the lid to be opened and is not necessarily the force from the selected linear actuator. If the required force for a particular mounting configuration is greater than the maximum force from the selected actuator, a red error text will be displayed in the results window, like seen with mounting position B. If your selected linear actuator does not have the required force for any of the mounting positions, you can make adjustments in the dimension section to find a feasible result. These adjustments will depend on how flexible your design is and may include choosing a higher force actuator, changing the lid mounting position, or increasing the number of actuators.
Recommended Product

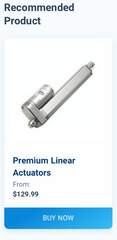
Once you have found a feasible mounting configuration and suitable linear actuator, the recommended product window will appear on the left-hand side of the calculator. This window will display the suitable linear actuator that you have selected and provide a quick link to the product page of that actuator.
Now that you know how the Linear Actuator Calculator works, put it to good use and find the right linear actuator for your needs.