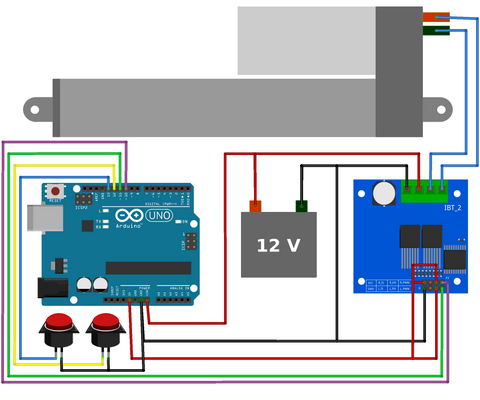
In this example we’ll control the direction of a linear actuator with an Arduino and two momentary switches. This tutorial builds on principles discussed in the tutorial “Motor Driver Speed Control with an Arduino”, we advise reviewing that tutorial before continuing.
This tutorial is broken into two sections: push buttons acting in momentary mode (i.e. actuators stop moving when button is released) and push buttons acting in sustaining mode (i.e. actuators continue moving even when button is released).
Note: This tutorial assumes prior knowledge with basic electronic principles, Arduino hardware and software. If this is your first time using Arduino we suggest learning the basics from one of the many great beginner tutorials available through Google and YouTube searches. Please be aware that we do not have the resources to provide technical support for custom applications and will not debug, edit, provide code or wiring diagrams outside these publicly available tutorials.
Components
- 12V Linear Actuator
- 12V power supply
- Arduino
- Motor Driver
- Two momentary buttons (optionally a third button for latching control)
- Electrical wires for making connections and crimping tool or soldering iron
Wiring

Hardware and software overview for momentary control
Momentary switches are used when you only want the actuator to move while the button is pressed, the actuator will automatically stop moving when the button is released. Upload the code below.
Code for momentary control
https://gist.github.com/Will-Firgelli/aeee209bda6b2246359eed70ec353eb8
/* Firgelli Automations
 * Limited or no support: we do not have the resources for Arduino code support
 *
 * Program enables momentary direction control of actuator using push button
 */

int RPWM = 10; //connect Arduino pin 10 to IBT-2 pin RPWM
int LPWM = 11; //connect Arduino pin 11 to IBT-2 pin LPWM
int downPin = 12;
int upPin = 13;
int Speed = 255; //choose any speed in the range [0, 255]

void setup() {
  pinMode(RPWM, OUTPUT);
  pinMode(LPWM, OUTPUT);
  pinMode(downPin, INPUT_PULLUP);
  pinMode(upPin, INPUT_PULLUP);
}

void loop() {
  if(digitalRead(upPin)==LOW){ //check if extension button is pressed
    analogWrite(RPWM, 0);
    analogWrite(LPWM, Speed);
  }

  else if(digitalRead(downPin)==LOW){ //check if retraction button is pressed
    analogWrite(RPWM, Speed);
    analogWrite(LPWM, 0);
  }

  else{ //if no button is pushed, remain stationary
    analogWrite(RPWM, 0);
    analogWrite(LPWM, 0);
  }
}
Hardware and software overview for sustaining control
Alternatively, sometimes you may wish to use a latching button; have the actuator move when you push a button and then keep moving when you release the button. To achieve this you will need to add one more switch, connected to pin 8 and GND, then upload the program below. Since the actuator won’t stop moving when the button is release, this new switch will act a “stop” button.
Code for sustaining control
https://gist.github.com/Will-Firgelli/2b96dce14c0cee7a0009e61e47cc5f67/* Firgelli Automations
* Limited or no support: we do not have the resources for Arduino code support
*
* Program enables latching direction control of actuator using push button
*/
int RPWM = 10; //connect Arduino pin 10 to IBT-2 pin RPWM
int LPWM = 11; //connect Arduino pin 11 to IBT-2 pin LPWM
int stopPin = 8;
int downPin = 12;
int upPin = 13;
int Speed = 255; //choose any speed in the range [0, 255]
void setup() {
pinMode(RPWM, OUTPUT);
pinMode(LPWM, OUTPUT);
pinMode(stopPin, INPUT_PULLUP);
pinMode(downPin, INPUT_PULLUP);
pinMode(upPin, INPUT_PULLUP);
}
void loop() {
if(digitalRead(upPin)==LOW){ //check if extension button is pressed
analogWrite(RPWM, 0);
analogWrite(LPWM, Speed);
}
else if(digitalRead(downPin)==LOW){ //check if retraction button is pressed
analogWrite(RPWM, Speed);
analogWrite(LPWM, 0);
}
else if(digitalRead(stopPin)==LOW){ //check if retraction button is pressed
analogWrite(RPWM, 0);
analogWrite(LPWM, 0);
}
}