In this example we’ll demonstrate how to use an Arduino to read the signal from Firgelli's Feedback Rod Actuator and convert this into a distance measurement of how far the rod has been extended. This tutorial builds on principles discussed in the tutorial “Motor Driver Speed Control with an Arduino”, we advise reviewing that tutorial before continuing.
Note: This tutorial assumes prior knowledge with basic electronic principles, Arduino hardware and software. If this is your first time using Arduino we suggest learning the basics from one of the many great beginner tutorials available through Google and YouTube searches. Please be aware that we do not have the resources to provide technical support for custom applications and will not debug, edit, provide code or wiring diagrams outside these publicly available tutorials.
Components
- Feedback Rod Linear Actuator
- 12V power supply
- Arduino
- Motor Driver
- External potentiometer (for the second part of this tutorial)
- Electrical wires for making connections and crimping tool or soldering iron
Wiring
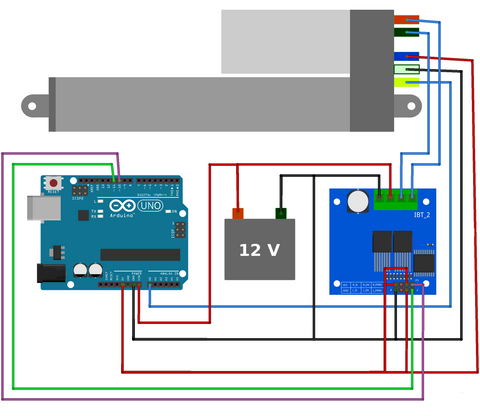
Hardware and software overview for reading position
Assemble the circuit as above and upload the code below. You will need to modify line 16 of the code to your specific stroke length, it is currently set for a 6 inch feedback rod actuator.
This program will initially extend and fully retract the actuator to find the minimum and maximum analog sensor reading from the potentiometer (line 27 and 28 of the code). This is necessary because despite the range of the potentiometer readings being [0, 1023], in practice this range may be reduced due to the gear ratio inside the actuator preventing the potentiometer fully rotating to its limit.
Following this initial calibration sequence the actuator will continuously extend and retract outputting a stream of data displaying the current extended length of the linear actuator (in units of inches).
Code
https://gist.github.com/Will-Firgelli/8c78092ca850aa8a50ae36842b97150f/* Firgelli Automations
* Limited or no support: we do not have the resources for Arduino code support
*
* Program enables momentary direction control of actuator using push button
*/
#include <elapsedMillis.h>
elapsedMillis timeElapsed;
int RPWM = 10;
int LPWM = 11;
int sensorPin = A0;
int sensorVal;
int Speed=255;
float strokeLength = 6.0; //customize to your specific stroke length
float extensionLength;
int maxAnalogReading;
int minAnalogReading;
void setup() {
pinMode(RPWM, OUTPUT);
pinMode(LPWM, OUTPUT);
pinMode(sensorPin, INPUT);
Serial.begin(9600);
maxAnalogReading = moveToLimit(1);
minAnalogReading = moveToLimit(-1);
}
void loop(){
Serial.println("Extending...");
sensorVal = analogRead(sensorPin);
while(sensorVal < maxAnalogReading){
driveActuator(1, Speed);
displayOutput();
delay(20);
}
driveActuator(0, Speed);
delay(1000);
Serial.println("Retracting...");
sensorVal = analogRead(sensorPin);
while(sensorVal > minAnalogReading){
driveActuator(-1, Speed);
displayOutput();
delay(20);
}
driveActuator(0, Speed);
delay(1000);
}
int moveToLimit(int Direction){
int prevReading=0;
int currReading=0;
do{
prevReading = currReading;
driveActuator(Direction, Speed);
timeElapsed = 0;
while(timeElapsed < 200){ delay(1);} //keep moving until analog reading remains the same for 200ms
currReading = analogRead(sensorPin);
}while(prevReading != currReading);
return currReading;
}
float mapfloat(float x, float inputMin, float inputMax, float outputMin, float outputMax){
return (x-inputMin)*(outputMax - outputMin)/(inputMax - inputMin)+outputMin;
}
void displayOutput(){
sensorVal = analogRead(sensorPin);
extensionLength = mapfloat(sensorVal, float(minAnalogReading), float(maxAnalogReading), 0.0, strokeLength);
Serial.print("Analog Reading: ");
Serial.print(sensorVal);
Serial.print("\tActuator extension length: ");
Serial.print(extensionLength);
Serial.println(" inches");
}
void driveActuator(int Direction, int Speed){
switch(Direction){
case 1: //extension
analogWrite(RPWM, Speed);
analogWrite(LPWM, 0);
break;
case 0: //stopping
analogWrite(RPWM, 0);
analogWrite(LPWM, 0);
break;
case -1: //retraction
analogWrite(RPWM, 0);
analogWrite(LPWM, Speed);
break;
}
}Using an external potentiometer to control postion
The above example has demonstrated how readings can be taken from the Feedback Rod Actuator, but say we want to move the actuator to a specific position, how do we do this? The following section goes over such a situation by using an external potentiometer as the user input for the desired setpoint position of the actuator. In practice you can modify this example to take user input from whatever form you want.
Wiring
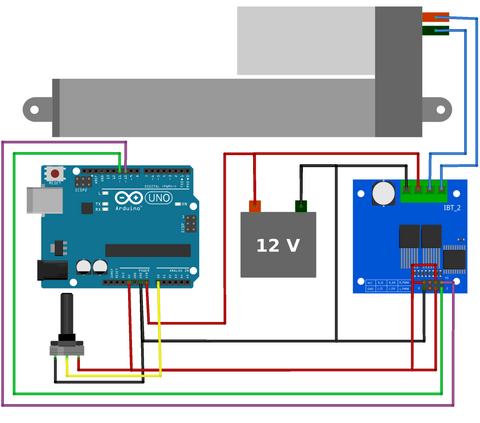
Hardware and software overview for position control
The wiring is almost the exact same as the first part of this tutorial, only now an external potentiometer has been connected to analog pin A1.
The program, below, moves to the position set by a user via the external potentiometer. In line 18 of the code a buffer variable is set, this is utilized later in lines 36 and 39. The buffer vairable gives a range around the desired setpoint position where the actuator will stop moving, this is required as of the two potentiometers have a tendency to fluatate by +/-2 units. As such if the buffer was not included the actuators would violently vibrate around the setpoint position. To see this in action set the buffer in line 18 to zero (do not allow actuators to vibrate for a long time as it can cause damage).
Code
https://gist.github.com/Will-Firgelli/41ec87433f0aaa1abc33e79168076b3b/* Firgelli Automations
* Limited or no support: we do not have the resources for Arduino code support
*
* Program enables momentary direction control of actuator using push button
*/
#include <elapsedMillis.h>
elapsedMillis timeElapsed;
int RPWM = 10;
int LPWM = 11;
int sensorPin = A0;
int potPin = A1;
int potVal;
int sensorVal;
int Speed = 255;
int Buffer = 4;
int maxAnalogReading;
int minAnalogReading;
void setup() {
pinMode(RPWM, OUTPUT);
pinMode(LPWM, OUTPUT);
pinMode(sensorPin, INPUT);
pinMode(potPin, INPUT);
Serial.begin(9600);
maxAnalogReading = moveToLimit(1);
minAnalogReading = moveToLimit(-1);
}
void loop(){
potVal = map(analogRead(potPin), 0, 1023, minAnalogReading, maxAnalogReading);
sensorVal = analogRead(sensorPin);
if(potVal > (sensorVal+Buffer)){ //addition gives buffer to prevent actuator from rapidly vibrating due to noisy data inputs
driveActuator(1, Speed);
}
else if(potVal < (sensorVal-Buffer)){
driveActuator(-1, Speed);
}
else{
driveActuator(0, Speed);
}
Serial.print("Potentiometer Reading: ");
Serial.print(potVal);
Serial.print("\tActuator reading: ");
Serial.println(sensorVal);
delay(10);
}
int moveToLimit(int Direction){
int prevReading=0;
int currReading=0;
do{
prevReading = currReading;
driveActuator(Direction, Speed);
timeElapsed = 0;
while(timeElapsed < 200){ delay(1);} //keep moving until analog reading remains the same for 200ms
currReading = analogRead(sensorPin);
}while(prevReading != currReading);
return currReading;
}
void driveActuator(int Direction, int Speed){
switch(Direction){
case 1: //extension
analogWrite(RPWM, Speed);
analogWrite(LPWM, 0);
break;
case 0: //stopping
analogWrite(RPWM, 0);
analogWrite(LPWM, 0);
break;
case -1: //retraction
analogWrite(RPWM, 0);
analogWrite(LPWM, Speed);
break;
}
}


